Wednesday, February 20, 2013

Railz Miniworld part 2 (2009)

After finishing my internship, getting a reward for being best student of our department (Furniture, Architecture and Construction-Infra) and graduation, I went back to Railz Miniworld to help them out to finish their mayor project: Miniature city Rotterdam.

There weren't much weeks left till the deadline, but I got several things to do.
 One of the things was to come up with a drawing and prototype for a new frame which had to be placed underneath the existing buses. It needed to be able to contain the existing wheel-part and electronic compartments.

This was the prototype I designed:
bus frame top view
Bus frame bottom view
Bus frame side view
It wasn't 100% accurate, since the front wheels weren't able to make the full turn. Unfortunately, due to the battery pack  there wasn't any plastic left to carve out that needed extra space.

Another project I got was to make a mall which came beneath an apartment complex.
For that I had to come up with some random stores which could be placed in Rotterdam.
One of the first things I wanted was an Irish Pub. For some reason I like the rustic vibe it gives.
This also was the part with the most pieces.
Next to it had to become a passage, which I made like an old city entrance.
Other stores I included were: A supermarket, a snackbar; with a wall take out, a toystore, a bookstore, a clothingstore and a candyshop.
Also I was allowed to come up with names for these stores.
The Pub I called Murphy's Law; it sounds Irish and it has the deeper meaning of: Anything that can go wrong, will go wrong.
Luckily nothing went wrong.
2 Other stores I named were: Bert Smid (toy store, derived from the Dutch toy store "Bart Smit") and Scapibra (A clothing/item store derived from the combination of "Scapino" and "Wibra")

Murphy's Law, the passage and
the snackbar in their unpainted state.
Murphy's Law at the other side.


The finished version of Murphy's Law.
Because it's dark brown it's not really visible on this photo,
But I can assure you that it looked very well with the lights on.

The supermarket

Scapibra and Bert Smid
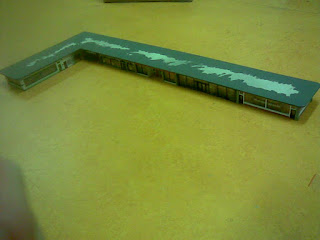
The finished mall piece; the rooftop isn't fully painted because
of the apartment complex which  will be placed on top of it.

The end product with the apartment complex on top of the mall; notice that the side isn't finished yet. The road isn't finished painting, there's junk all over the place and no figurines are displayed yet.

Next I got to make a few bridges every here and there where the rails would go over the water. I don´t have pictures of those laying around.
We were send home after the big opening; they simply didn't have any projects anymore for use at that moment.

A picture from the official Railz Miniworld site at which you can see
the end result of some buildings I covered in my 2 Railz blogs.

Sunday, February 17, 2013

Internship Railz Miniworld (2009)

My 2nd internship was at Railz Miniworld Rotterdam.
It's the biggest inside miniature world of the Benelux. (Belgium, The Netherlands, Luxembourg)

Because it was clear that I wanted to do more in life than furniture alone, my teachers decided it was a good thing to look for an internship where I could use the skills learned at school for something different.

The place I spend most of my time; the desk at the workshop.

At Railz they were looking for someone to make 2D drawings in AutoCAD and to convert those for a CNC grinder so it could cut out the pieces.
This became my main responsibility. The boss gave me some guidance about what he wanted to be drawn and I would make sure that in the end the builders would have their model kit.

Example of an AutoCAD drawing. This is for the Rotterdam water scouting building.
The CNC reads the different colored lines; White is around, Green is inside and Blue is in the middle.
In a miniature world 1 mm difference is very much. (1:87. 1 mm is 8,7 cm!)
I helped with several buildings. Beneath I will show you some of them.

This is an actual Rotterdam schoolbuilding. The boss did most of  the drawing.
I had to fill in the bricks of the wall and make the pieces.

Station Delfsche Poort was a big building (even as a miniature).
This was also a project which was mostly drawn by the boss.

Station Rotterdam Blaak was already near completion.
I mainly had to  make the letters and some last pieces.

This is the ventilation building in Rotterdam. I helped with the CNC grinding.
This was one of the fist project I got to make from start to finish.
It's a bridge pilar.


 My first big project was Station Rotterdam-Zuid.
Entrance of the train station Rotterdam Zuid.
I spend quite some time on figuring out the actual size and shape of the building. I had several pictures, but I also had to take notice that it would fit the actual place at Railz itself. They had already placed the railway, so it was up to me to decipher how to stretch or shrink the building so it could fit.

In the end, after several measurements and tryouts I ended up with this model-kit:
Good luck to the lucky fellow to make something out of it.
My parts and pieces were send to one of the builders. With ease he managed to create the actual model out of it.
Finished station. Although there will be lighting fit inside as well as working clocks.
The marshmellows were added by the model builder. We all had a weird sense of humor.

That was Project 1.
Project 2 was a building I also got to make instead of just drawing.
They wanted a typical Rotterdam apartment building. The boss already had several pictures ready for use.
With this project I learned how to build and paint a building using different types of paint (model paint, spray paint) and glue types.

Finished building. I also made the electronic connections for LED's
Lateron I added some more figurines.
(The Unicorn (Charlie)  isn't part of the building; that's just an other example of the weird sense of humor.)

In Railz it is tradition to add yourself in miniature.
So this is me and next door a good friend living with her idol: John Morisson.
One of the biggest challenges has to be the Rotterdam Euromast (Project 3).
There was an event coming up. 2 People would do the bed laying like Yoko Ono and John Lennon did years before. It was for a charity (WarChild) and planned in the Euromast within 2 weeks.
Our boss thought it would be a good advertisement if we would have the Euromast by then with a miniature version of Yoko and John.
I teamed up with Floris Dilz; our most experienced builder and we did our best to get it done within the two weeks.
For starters we bought a paper model kit. This was the base of our drawing, yet we had to resize it for the thickness of the plastic we use.
The drawing alone took nearly one week. I even took my work home to work on it during the weekend. Then we had one week left to get all the pieces, glue them together and paint it.
But we managed to do it on time!

Mid piece of the Euromast; unpainted.
Same piece, but now its pained by the model builder.


Finished scale model version of the Euromast.

I also made a small version of Yoko and John, but I can't seem to find that picture.

After the Euromast most of my time at Railz was done.
I made one last thing and that was this "Railz award":

Railz-Award
It was made as a thank you for the great time I spend. It contains the bridge pilar I made (see above in the post). The first attempt was too small so we kept it, maybe as a souvenir or they could use it for somewhere else. But now it got implanted in the award together with the logo and the "Thank you" plate.

One last thing I want to show is this miniature version of myself. I did not make it myself, but I got it as a gift from the builder who worked with me with the Euromast.
It represents me behind the computer of the CNC grinder.

The gift I received when my internship was over.

This is not the last of me in Railz. I went back during the vacation break, but that's in the next blog.


Internship Gerlag & Gerlag (2008/2009)

At my school it was required to do 2 internships; 50 days each.

My first internship was at the furniture company of the father of a schoolmate.
Due to their work on prototypes I'm not allowed to show or tell about the projects I made at their company.

None the less I can show some 3D drawings we had to make as an intern assignment directed from school.
That task was to come up with a few new ideas which could be helpful for the company.

The company I worked for mainly made chairs, tables, couches and closets. Most products were made in foreign countries like China and Romania. Here in Holland they made the prototype which they copied in the previous named countries.
None the less they did make some couches and chairs at the working place I was at.

Their characteristics were classic/modern. It wasn't something antique with reliefs or woodcarvings nor was it really modern like the use of chrome legs.
They used a lot of wood, sometimes big boards of wood were used in table tops.
Their fabric colors were varied; most often they used colors that weren't at the bright side of the color scale like grey, moss green, black, beige. Sometimes they had striped fabric, others had some sort of pattern.

Below I add some pictures to show their style of work:

This image is property of Gerlag & Gerlag 

This image is property of Gerlag & Gerlag 

This image is property of Gerlag & Gerlag 

This image is property of Gerlag & Gerlag 


In the first days of my internship I had to measure up and make 2D drawings of most of the couches/ chairs in the showroom. This gave me quit some time to get familiar with their type of design.
For the design task I chose to do some table designs. 

Table with a checkered pattern in the tabletop.


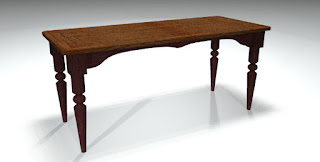
A basic and classic styled table


A table with 2 X marks on the tabletop.
Because tables alone were a bit boring I tried to
create an ambiance using 3D drawn items in my image.


Sidetable with little pegs at the tabletop corners, which I saw in one of their table designs as well.


A different colored version of the one above and with 3 legs instead of 4.
The diagonal leg was taken from a ellipse shaped table they already had made.


Again a more classic looking table

Same table as above, but now with some more characteristic items.

That is about it when it comes to showing pictures.
The only things I can tell is that I made the drawings and prototype for a new type of foldable tabletop.
Next to that I worked at a flyer display made from an old table.
Also I designed and made a small rack to place fabric examples on.
And I helped with the making of the wooden frame of a couch armrest.

Schoolproject: Furniture Line (2009)

This is the last project from school. This project is also the one we had to graduate with.

The assignment was to come up with 3 types of furniture, each resembling each other in some way, making one whole unit.
F.e.: If one designs a table with specific legs, you need to make 2 other types of furniture with that same resembling legs like a couch or chair.

I ended up in the bedroom again. Therefor designing a bed, closet and nightstand (yes, there it is again)
One of this products had to be chosen to make detailed descriptions about. Also with that piece of furniture we had to write a business plan; a report on how we wanted to start our own company producing at least 10 items each week.

For that I chose the bed, since it contains less parts.

As always it was our task to find something that would set it apart from other same typed pieces of furniture.
To me, my eye fell on the iron structure in the old station near our school.


The structure was tough, but in a way it had a classic look to it.
Using that building site like vibe as a reference I got to this sketch:


The sketch itself wasn't that spectacular, but it was a guidance for me to make a better drawing in 3D.


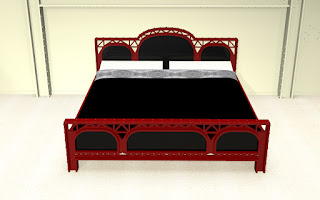
3D drawing; front side
3D drawing; perspective


I also had to design a nightstand and closet, which are depicted in the drawing below:
The finished 3D drawing, including a similar themed room.
(Notice the applicable poster above the bed.)
After the 3D and AutoCAD drawings it was time to make a scale model.

For that I mainly used 3mm MDF and for the arches I used 1mm cardboard.
That building process is described below.

As with the Showcase assignment I printed a scaled version with AutoCAD and glued it to the 3mm MDF.
After that I needed several hours again behind the fretsaw to cut out all the little triangles.

The bed frame underneath the fretsaw.
Some triangles weren't much bigger than the actual saw width.
To show how small the headboard is I laid a pen next to it.

This is the front piece of the nightstands where the hinge is glued into place.

The finished closet without color yet. All hinges work, making it excellent dollhouse furniture.
The unpainted product compared to the 3D drawing.
Finished end product.
The rivets were made by placing small droplets of wood-glue on top of the cardboard.
The mirror is mirrored tape and the carpet is made from a towel.
Finished end product showing how big it actually is.