Sunday, April 3, 2016

Memo Board (2016)

Next to the walls, my shelves, nightstand and such, I also needed something new on my door.
There used to be a plastic memo board with a small pinboard and whiteboard. Although functional, it didn't really look great.

Finished piece

There wasn't really a plan for this build, I took some measurements about the width and how big I wanted the shelves and the middle section to be (I wanted it as big as regular business cards and other passes/cards.
It's made from left-over pieces of wood (plywood/ MDF), a reused pin board and old curtain hooks. Basically the whole thing is made from actual scrap.

Grey primer

When the woodwork was done I gave it a grey primer. On the left side I wanted a pin board, I used the cardboard one with the self adhesive velours from the previous memo board (I cut it to fit) and on the right side there would be a chalk board.

I had some left over brown from previous projects, this was going to be the base color. I liked to give it that "antique" look, but not the sanded kind (where you sand the edges, making the base color show through, with the risk of sanding too much and revealing the primer or wood)
I read somewhere you can use vaseline on the edges to prevent the top coating from sticking to the surface. I didn't have any laying around, I did however, have some hair straightener spray I never use. I took out the nozzle bit and applied some of the liquid with a paintbrush to the edges and a small dot/ strike every here and there.
When the white coat was applied and dry, I could easily scrape off the parts where I'd applied the hair straightener, with my nails (strong tape will also work).

To finish this project I painted the chalk board with special chalk board paint.
And I added some old curtain hooks to hang things on.


Finished and filled with things to show its functionality.
Finished piece perspective view.

Nightstand "Craquelé" test (2016)

Back in the days I've seen some things done with a special "craquelé" paint. This cracks the top layer of paint, revealing the color beneath it through the cracks.
While I redid my room (the green is still there, no worries, but now there's also a soft yellow wall and a brick-wall-wallpaper-wall.)
Anyway, I wanted to give the craquelé an attempt on an old nightstand I had.

Finished piece. Looks better in reality than on the picture I must say.
The original nightstand was unpainted pine-wood. I gave it an orange primer; the one I've also used for the shelves I made not that long ago, which also are this kind of craquelé by now. The craquelé worked a bit better on those, but I lack pictures of them (Maybe I'll make them later).

Back to topic: The nightstand was sanded, orange primer as was added. After that the "base" color was added; this is the color that shines through the cracks.
Then a special liquid was applied (It reminds me of diluted glue the kids use at primary school). The lady from the store said to let it dry and quickly apply the top color.

Orange primer
Original color

Brown under coat
Mint top coat, green sided and red rims.


This went fine with the drawer as this is a small surface, but the door was a different story.
I've redone it twice or so. What I did last time is to let the "liquid" dry really well (it doesn't matter if you leave it for a few days, so don't hurry). Then apply the color coating in a thick layer; don't keep rubbing the surface with your brush as it will mess things up with the "liquid" coating.
Also keep the surface flat. Due to the thick layer of paint it will run down if you keep things up right.

To give things an even older look I've sanded some of the corners a tiny bit. The orange wasn't such a great choice for this, blue might be nicer.

Another thing: The cracks have a certain way of cracking; the nicest cracks are the ones where this "liquid" coat is applied in the same stroking direction as the final coat. (drawer is done this way, the top is done the other way; liquid on the top was applied top to bottom and the top color is done left to right.)

Top coating, as you can see the cracks aren't nicely "open" due to the different stroking directions.


Fun to show: The door, cleaned with a scouring sponge.
Which actually is a nice effect also (ideal for faux-copper).

FruitCorso "Time Flies"; Swallow Model (2016)

I wasn't allowed to post this sooner as the design was still a secret.
But this years' theme is "Time Flies"; it's a clock that is carried by swallows and butterflies.
I got the task to create the heads of  the birds, but I didn't have a really good reference so I build my own model.

Finished Swallow front view
To start a project as this it's important to have  bunch of reference material. In other words: Get yourself a lot of pictures of the subject, preferable from different angles.

Before I started I made some sort of frame. I glued several sticks and stirrers together (and later even more sticks as the bird became to heavy for the first support)
On this I mounted a piece of tinfoil wrapped a bit to the shape of the bird.

Abstract tin foil art.

On this sad looking "abstract art" I added clay, I gave it a face and some details as body feathers. I didn't add the wings/tail or legs, but I gave it little stumps where they should be.


Stumpy body

The wings are made from scraps of cardboard. On paper I made a drawing of one wing. This I copied a few times to be able to cut the separate feathers. (As they overlap, you can't cut them from just 1 copy).
For the second wing you flip the paper templates.
My wings consist of 4 parts: Inner-part, big feathers, smaller feathers, outer-part. The inner and outer part have so many small feathers, it's easier to create them with a layer of clay.
The clay will also smoothen the transition from the wings/ tail to the body.

Bird with the cardboard wings.

Iron wire feet.

For it's feet I used iron wire for a frame and wrapped it with some thread. The nails are done separately and glued them on when they were dry.
When all was done I painted everything with white primer (I didn't want it to be glossy).

I also made a new frame to support it.

Right side
Left side


Back side

 
Semi-front side

Harry Potter "The Monster Book of Monsters" Replica (2015)

At first this started as a prank for a "Sinterklaas surprise", but it turned out better than I hoped, so I kept it myself.

A "Surprise" is a crafted way to wrap a gift. Most often you make something typical of the person who will get it. This person is a fan of a.o. Harry Potter and therefor I wanted to make a "Monsters Book of Monsters" from the movie. Instead of making it out of cardboard I wanted to make one of wood/ clay and fake fur.

My "Book of Monsters"

The Actual book from the movies


A comparison between the real replica and mine.
 I started off by making a wooden book, which is basically just a box with a lid (and a curved backside). These you can by in certain stores as well (Xenos)
Because it had to be made to hold a specific gift I didn't take measurements from the actual book.

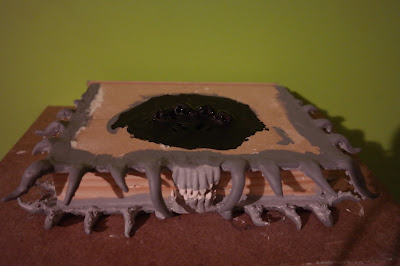
With clay I've added the tentacles, eyes, teeth etc.
This is basic air drying clay. I do recommend to wet the wooden surface when you attach the tentacles. Even better is to first rub a layer of clay firmly to the (wet) wood and add the tentacles to that. If this fails, you can always use some wood glue to attach them once dry.


Opened book, unpainted
 Since the tentacles resemble those of octopuses, they need suction cups. Make a tiny ball (1 mm and press the backside of a needle in the center; repeat this step numerous of times).
These are attached with wood glue.

For the eyes I've used some stuffed animal eyes I had once bought 2nd hand.

Some Base colors

The book had some detailed carved letters. I can't carve that well out of wood, luckily clay is a lot easier. I've used a toothpick for this; the "ugly" edges can be sanded when the clay is dry.

Carved clay

Once all the clay parts are in place, the paint job starts. First of are some base colors. When those are applied the actual colors can be put on.
Mostly I used the "dry brushed" one and on the tentacles I've also splattered a bit diluted paint.
The letters are painted gold first then I added dark grey by holding the brush flat, this way it doesn't get into the letters (I might redo the gold bits, because I'm not 100% satisfied with them as they do not show that well).
After the paint I added a semi gloss clear varnish. If you like your book to look more slimey/wet I suggest you use glossy varnish.

Top view with the base coatings

When the varnish part is done it's time to add the fur. This is a tricky task. But I cut a piece that was big enough and glued it with hot glue on my book. At the places where the letters and eyes were I cut a hole. You can play around with the fur a bit to readjust it and it's okay if you cut to much; you can always put tiny patched back and comb the hairs a bit so it's not that noticeable.


I wanted to say: Then you're done, but there's one more part: Adding the pages.
I've looked on google for pictures and found one. Using Paint I copied and mirrored it, so I could align them in the middle (where the teeth are, so you can hardly see the seam).


And now you're actually done. You can always make the inside look nice with some velours/ velvet fabric or just paint it. 


 (If you might wonder what my friend got instead: I made a last minute Tardis from cardboard, so no harm is done. Lucky for my I've already had some experience making Tardisses ;))