Sunday, November 24, 2013

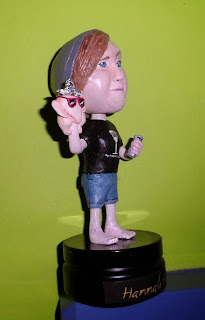
Wobble Head Hannah Hart (2013)

One of the things I wanted to try once in my life to make is a Wobble head, or head knocker or head wobbler.

Final product on my crowded shelf.
I didn't really know of what or who to make one off. But I follow some people on Youtube and decided to make one in honor of Hannah Hart.
Hannah Hart is a Youtube celebrity famous for her comedy sketch "My Drunk Kitchen", which is basically her, drinking and trying to cook.
But that's not all she is. She's also a great comedian, motivational speaker and a supporter of food banks across the country (America).

I started by getting a picture to work with:
Hannah Hart with tin foil hat in My Drunk Chicken.

This one was taken from her My Drunk Chicken episode which is one of my favorites.
From this I made a sketch.
A Sketch drawn with pencil.
Wobble heads are never 100% accurate, they're meant to be more of a caricature of someone. Also I didn't want to get messed up with too many hair, therefor I drawn her with a beanie; a much worn item in her older videos.

To create a 3D version of the drawing I made a simple frame.
Ping Pong ball head with a cardboard/ iron wire frame.

It's bent Iron wire glued to a cardboard figurine.
The head is made from a ping pong ball where a piece of PVC is glued inside. This makes the head lighter once you shape it with clay.

I then used some painting tape to shape the basics of the face.

Packed head with painting tape.

As clay I wanted to try paper clay. This type of clay is lighter than normal clay. But you need to make it yourself. I used a recipe of wood dust mixed with wood clay and wallpaper paste. This isn't the ideal mixture, for me it's still in an experimental fase.
None the less I managed to shape the face:

1st try at her face.

I added the beanie and hair:

Side of her face where her bang comes from underneath her beanie.

Then it was time to get it painted. I gave it a white primer and used acrylics to paint the rest.

Not the best face even made.
As you might see the face is far from perfect. I never made that much faces in my life, so you can imagine the difficulty making it accurate.
At that time I didn't know what to do with it, so it got on the pile of unfinished projects.

With FruitCorso I learned a bit more about the shapes of a face. I noticed one of the mistakes of the facial structure were the eye sockets. They need to be deeper.
When I had some spare time I picked up the project and tried to reshape the face.

A very awry and eerie picture; Sorry Hannah!


Fixed face.

When I finally was happy with the way it looked now, I gave it a new layer of primer.

The face with a white base.
I also started to work at the body.

Rough paper clay attempt.
With pencil I tried to fill in some detail of her face.

Because the paper clay wasn't ideal to work with I used normal air dried clay to do details on the body like the chicken, hand and feet. The body didn't have to be really light, so it wasn't a problem to do this.

There was still a problem with the face, I redid some details one more time and gave it a final paint job.
Then it was time to connect the head. I used thin iron wire which I spun around a tooth pick. The spring is glued into the PVC and in a hole in the neck and measures about 1,5 cm.

Finished Front side
Finished back side

Finished 3/4 view.
 I mounted the wobble head onto an empty candy container which I painted black. I also added Hannah's name and a famous quote of her "No one is wired wrong, because there is no wrong or right in the way we are."

Some references:
The Chicken is from the episode, but unlike the video I placed it on her hand instead of on her beer.
The beer is in her other hand.
The Tin foil cap is also from that same episode.
The glasses are a slight reference to friends. But Hannah does own a pair of pink glasses.
The shirt contains the logo of her show.
On the back is the logo of herself.
Her pants are taken from the "Oh, Internet" video
And the towel in her back pocket is taken from "My Hangover Kitchen: Breakfast Burrito"

I made an animated gif of the video I made to show it wobbles just fine.
Wobble, wobble, wobble.

Is I one day make another wobble head I shall cast it in resin, this way it's less fragile and easier to make hollow/ lighter.

Wednesday, October 2, 2013

FruitCorso; De Bockereyders (2013)

Like every year I join our building team in constructing a float for the FruitCorso parade.
Floats that are decorated with fruits, vegetables and seeds.

A Photoshop drawing I made from a print screen.
This year we got the design of "De Bockereyders" (The Billy-goat riders) which is an old folklore about a couple of bandits who would steal and rob from the rich people and divide it underneath the poor. At least this was the story we choose, since there are all kinds of different stories about them. Some say they are devil worshippers and they plundered churches and old farm houses while other stories tell the same kind of tale as the witch trials in Salem where innocent people were condemned for crimes they didn't do.

Anyway; as said: Our Bockenreyders are the good guys that acted like the Robin Hoods of their ages.

This year we had 2 designers; The one from last year + another builder. They came up with the idea to build 3 male goats, a captain with a mask and a hooded bandit

The model made by our designer.
We used the bars we already had from last year instead of welding a new low one. In the end this paid off quite well as it sorta disappeared inside the design.

I didn't do any welding this year. Instead I and 2 others were put into the Styrofoam cell to sculpt 2 human heads, 3 goat heads, 12 hooves, 4 hands, 2 boots, 4 horns (one set was made from iron) and 2 feet. This was quite a big task and we got some help from outside. A man who has helped several clubs with their sculptures. He showed up and in no time he finished a face and also did the jaw part of our Captain. Next to that he showed us what we had to change about the goat heads to really make them look like goats (we had a cow, aligator and some sort of rabbit).

From these rough shapes we had to make our finished faces/ heads.

I got the responsibility this year to do the final sculpting on the faces/ heads with plaster.
First I made pictures of what we had, then I used Photoshop to try to draw a better shaped face on it and tried to rebuild the face using plaster.

Before
After
After
Before
As you can see the end result is quite a change. But in a good way I might say.

One thing we did different this year were the eyes.

Normally we sculpt the eyes at the same time as the face and decorate them with seeds just like everything else, but I asked if I was allowed to make "real" eyes. I made a prototype from transparent globes, painted from the inside out. The designers really liked what I had created and got to make a set of brown and red eyes.

A transparant ball you can buy at most craft shops.

Finished brown eyes; 14 cm


Finished red eyes; 16 cm

Because we don't want everyone to be making these globes, I don't do an online step by step tutorial. But if you're really interested and want to make them f.e. Halloween, just send me a message and I'll send some of the pictures I made during the process.

They were covered up with plastic foil to prevent damage during the build. In the end that was cut off and the eyes were nice and shiney.

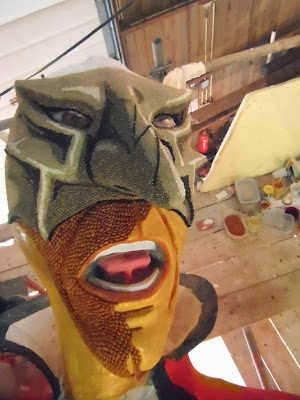
My next task was to design the faces. I worked together with the designers on this. And in the end they had enough faith in me to let me do the whole captains face the way I'd like to do it.
And so I did:
Painting
Adding seeds
Finishing the mask using: Blue Lupines,
Black pumpkin seeds, Black beans, Grass seeds,
Melon seeds and Tapioca.
Painted the lower half and added shade with brown beans.


Because our float was too big to fit through the door and viaducts, there had to be some break points inserted which could be lifted and lowered using hydraulics.


Raising the Captain's torso

Raising the front part of the billy goat. 

Final part of the raising.

The end position of the billy goat and captain.

A close up of the loot.

A very nice picture of the other face that was made.

A print screen of a video that was shot during the parade.

Out float became 8th in ranking by the Jury judgement. But! We got 2nd of the public voting!

Here is a video of the whole parade of the FruitCorso 2013

Sunday, September 29, 2013

Bird Outhouse (2013)

My father collects bird houses to put in this big walnut tree we have in our yard.
For his birthday I thought it would be fun to make a "Bird Outhouse".

Finished bird outhouse.

It's constructed from plywood. I tried pine wood at first but those pieces of board were to curved to work with.
I carved in some lines to make it look like it was made from several boards. And when it was finished I stained it with very diluted acrylic paint and gave it a nice mat varnish.

What you see through the door.
What you see from above.


Inside I made a little stool as you'd see in old outhouses. And I made a tiny toilet paper roll.
The door can be locked using a pin and the top can be opened to see if there's a nest or something.
The toilet stool can be taken out, making it more appropriate for a bird to nest inside.

I placed a little sign on the door that says "Vrij" (Free) and "Bezet" (Occupied)

Also on the side I glued a sign as a bit of a joke:

Fun sign.
A "Schijtlijster" isn't a real bird. It's roughly translated as someone who's chicken.
But the literal translation would be "Prohibited for shitty birds"

Stained Glass Course (2013)

This in the end assignment of my Stained Glass Course, which I followed next to the Wood/ Marble Imitation classes.

Finished piece.

It was an utterly awful design if I may be honest.
We had to pick our own pattern from the internet. I thought this one wasn't that hard because it doesn't have that many pieces.
In the end this happened to be the most difficult one of everyone. Even the teacher had a hard time to get the pieces without breaking the glass.

It became so difficult due to the bent lines. Bent lines aren't that difficult, but if you have to take a hollow shape out of something with a thin "neck" then it is extremely hard not to break things.
The other rookie mistake I made was to use patterned glass, it contains structure and some air bubbles. This glass will eventually break quicker than normal float glass.

In the end I think I tried like 15 times to make the lower dark green parts and about 10 times the orange curls.

I succeeded to make it all on my own, but then some pieces broke during the solder process.
Because we were running low on dark green structure glass, my teacher made the pieces from a different type and color glass.

I'm not done learning so I will make more stained glass items. The teacher is learning how to make stained glass with paintings inside of them (like those in churches). Once he knows enough we might get to learn it too.

Wood/ Marble Imitation Course (2011 and up)


 Some examples of my work from the Wood/ Marble imitation course.
To add:
Walnut Stretched Italic
Walnut Root Wood.

This year I want to learn Mahogany another marble and I'd like to learn how to gild.
St. Anna Marble (2012)
(Unfinished) Walnut Stretched Wood (2012)


Pinewood (2012)


Napoleon Rouge Marble (2012)
Napoleon Gris Marble (2011)


Teak Wood (2011)


White Marble (2011) Water base
Oak Wood Panel; Close up (2011)
Oak Wood Panel (2011)