Showing posts with label Paper mache. Show all posts

Sunday, February 1, 2015

FruitCorso: Haantjes Gedrag (Rooster Behaviour; 2014)

As every year I've been part of the FruitCorso builders team.
Fruitcorso is a yearly event where we go around town in a parade with floats decorated with seeds, vegetables and, obviously, fruits.

The design for this year was: Haantjes gedrag (Translated: Rooster Behavior. Open interpretation: Cock Fight)
Final result, 2nd place
This year has been slightly different than other years. Some massive changes occurred in the club I was part of for my whole FruitCorso career. The club were 2 clubs combined. Back in the days my club didn't have enough members and the club from our neighbor village didn't have a space to build anymore. So we fused together. This year that contract was shredded and the club was divided.

The Designer that had designed for 3 years had been asked else where. After much debate and this strange debacle she decided to go to her home town to design and build the float. Together with her we went with a team of the old club.

That aside the basics hadn't changed. You start with an iron frame, add syrofoam, paper, paint, glue and end with products.

Iron frame with Styrofoam head and comb; Rooster 1.

Iron frame partly covered with phone guide paper; Rooster 2
As for other years I was put responsible to make the heads with the Styrofoam team. They helped with the basic shapes and I could do the ending details. Also the designer assigned me with the head of Rooster nr. 1 to design, choose products and finish it.
Plastered face, with clay on the right side
Rooster 1
Plaster on Styrofoam,
covered with a layer of white paper
Rooster 2


Painted face
Finished face with dentures

The only directions I got was that he had to become angry. And that is what he became.
Because it's really difficult to do teeth, I made dentures from clay which I could decorate outside the mouth and later on glue them in.


To give him a bit more of a fighter look I gave him some scars using upstanding pumpkin seeds.

Most of my decorating time went into the face but here are some pictures of parts made by others:
Beginning with the vegetables; Rooster 1
More progress on Rooster 1


Detailed shot of the inside of the wing from Rooster 2

 We build in a shed/ hangar which means we're limited to the height of the door. Due to that we had to behead our rooster and use a crane to lift it and place it on the torso.
Assembling the roosters head
Flying head

Fitting it properly

 These were pictures of the test, it went back inside to finish it and it was put back together in Tiel before the parade would start.

End result Rooster 1
End result Rooster 2


Sunday, November 24, 2013

Wobble Head Hannah Hart (2013)

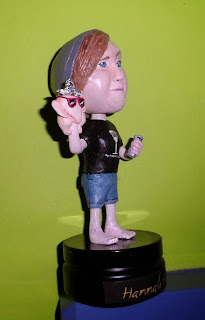
One of the things I wanted to try once in my life to make is a Wobble head, or head knocker or head wobbler.

Final product on my crowded shelf.
I didn't really know of what or who to make one off. But I follow some people on Youtube and decided to make one in honor of Hannah Hart.
Hannah Hart is a Youtube celebrity famous for her comedy sketch "My Drunk Kitchen", which is basically her, drinking and trying to cook.
But that's not all she is. She's also a great comedian, motivational speaker and a supporter of food banks across the country (America).

I started by getting a picture to work with:
Hannah Hart with tin foil hat in My Drunk Chicken.

This one was taken from her My Drunk Chicken episode which is one of my favorites.
From this I made a sketch.
A Sketch drawn with pencil.
Wobble heads are never 100% accurate, they're meant to be more of a caricature of someone. Also I didn't want to get messed up with too many hair, therefor I drawn her with a beanie; a much worn item in her older videos.

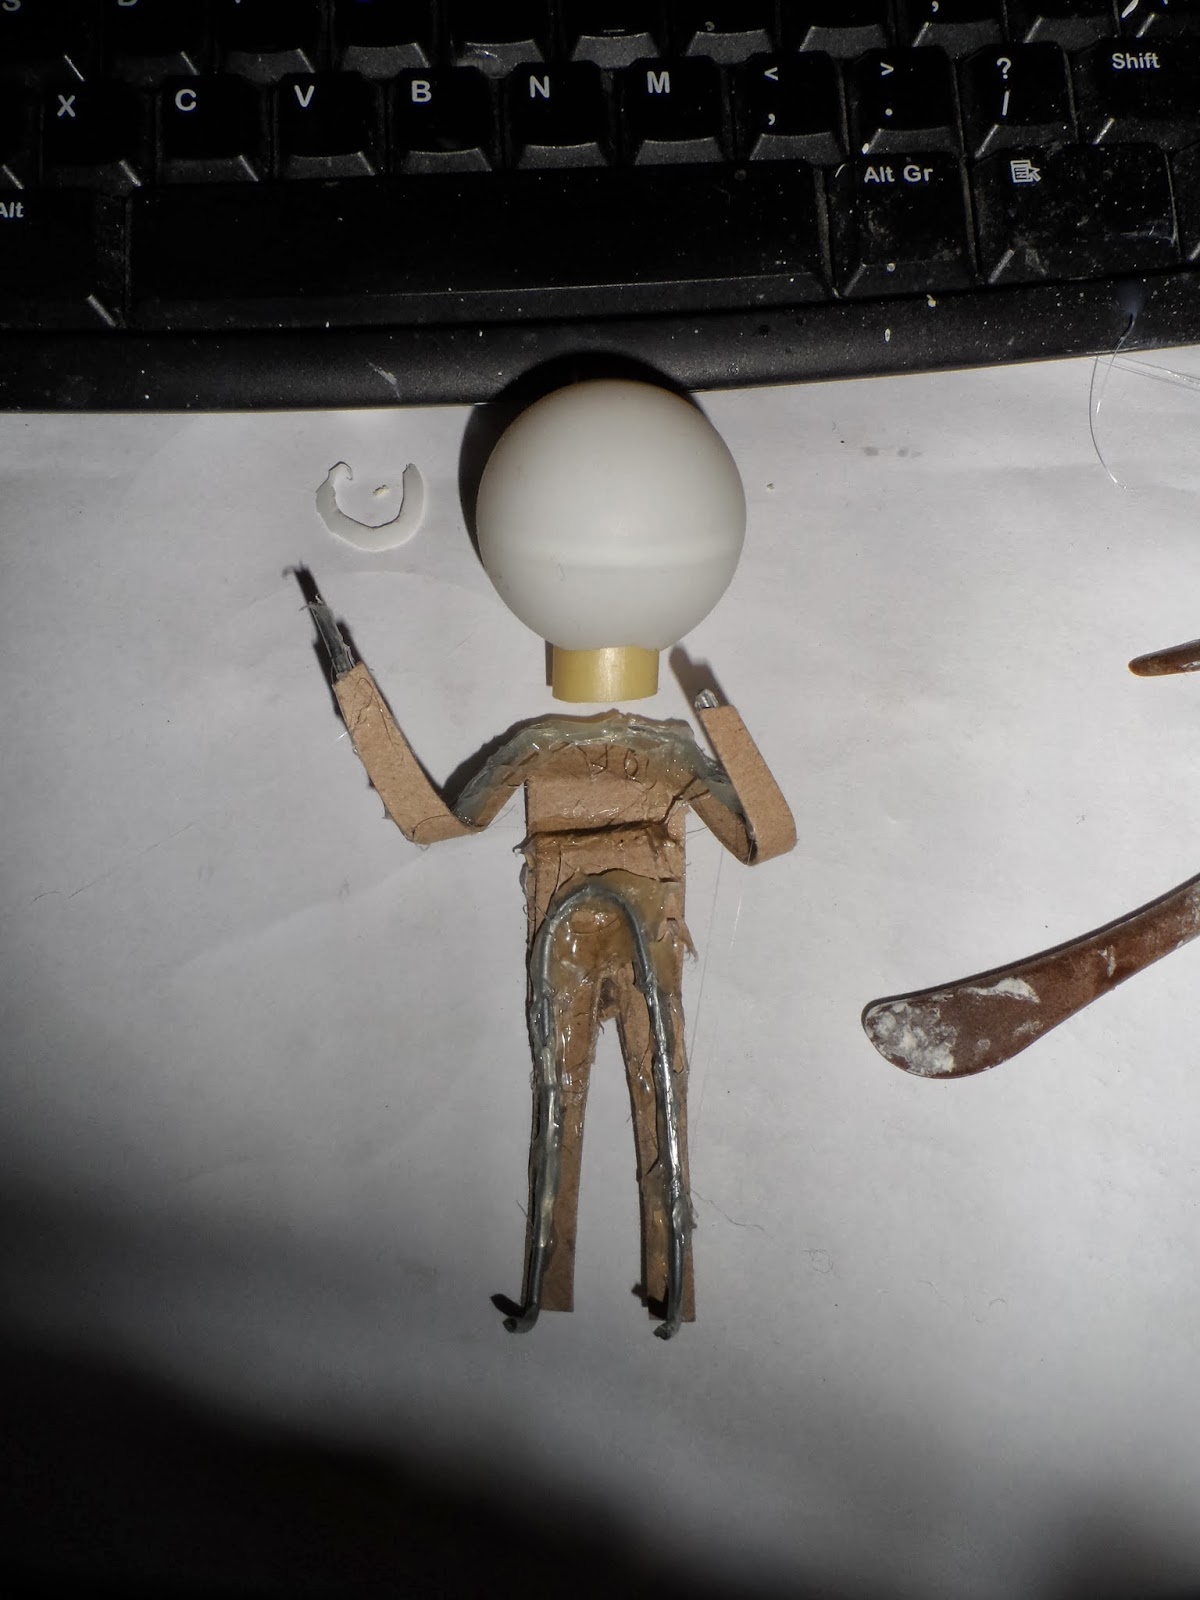
To create a 3D version of the drawing I made a simple frame.
Ping Pong ball head with a cardboard/ iron wire frame.

It's bent Iron wire glued to a cardboard figurine.
The head is made from a ping pong ball where a piece of PVC is glued inside. This makes the head lighter once you shape it with clay.

I then used some painting tape to shape the basics of the face.

Packed head with painting tape.

As clay I wanted to try paper clay. This type of clay is lighter than normal clay. But you need to make it yourself. I used a recipe of wood dust mixed with wood clay and wallpaper paste. This isn't the ideal mixture, for me it's still in an experimental fase.
None the less I managed to shape the face:

1st try at her face.

I added the beanie and hair:

Side of her face where her bang comes from underneath her beanie.

Then it was time to get it painted. I gave it a white primer and used acrylics to paint the rest.

Not the best face even made.
As you might see the face is far from perfect. I never made that much faces in my life, so you can imagine the difficulty making it accurate.
At that time I didn't know what to do with it, so it got on the pile of unfinished projects.

With FruitCorso I learned a bit more about the shapes of a face. I noticed one of the mistakes of the facial structure were the eye sockets. They need to be deeper.
When I had some spare time I picked up the project and tried to reshape the face.

A very awry and eerie picture; Sorry Hannah!


Fixed face.

When I finally was happy with the way it looked now, I gave it a new layer of primer.

The face with a white base.
I also started to work at the body.

Rough paper clay attempt.
With pencil I tried to fill in some detail of her face.

Because the paper clay wasn't ideal to work with I used normal air dried clay to do details on the body like the chicken, hand and feet. The body didn't have to be really light, so it wasn't a problem to do this.

There was still a problem with the face, I redid some details one more time and gave it a final paint job.
Then it was time to connect the head. I used thin iron wire which I spun around a tooth pick. The spring is glued into the PVC and in a hole in the neck and measures about 1,5 cm.

Finished Front side
Finished back side

Finished 3/4 view.
 I mounted the wobble head onto an empty candy container which I painted black. I also added Hannah's name and a famous quote of her "No one is wired wrong, because there is no wrong or right in the way we are."

Some references:
The Chicken is from the episode, but unlike the video I placed it on her hand instead of on her beer.
The beer is in her other hand.
The Tin foil cap is also from that same episode.
The glasses are a slight reference to friends. But Hannah does own a pair of pink glasses.
The shirt contains the logo of her show.
On the back is the logo of herself.
Her pants are taken from the "Oh, Internet" video
And the towel in her back pocket is taken from "My Hangover Kitchen: Breakfast Burrito"

I made an animated gif of the video I made to show it wobbles just fine.
Wobble, wobble, wobble.

Is I one day make another wobble head I shall cast it in resin, this way it's less fragile and easier to make hollow/ lighter.

Sunday, July 21, 2013

Shitty Rat (2012)

For Halloween 2012 I arranged a small carving party. With that there were colored pancakes, ghost chips, spooky soda flavours (ear grease; toe cheese, elf's blood etc.)
I also did some table decorations like the paper mache pumpkin from a previous post.
But also this rat made from paper mache:

Finished rat; side view

Finished rat; front view

It's a rat with a bottle inside of him. The cap of the bottle holds a fake cork which can be screwed off.
It was made using the basics of the Dungeon Rats from Stolloween.
Basically adding carton frames to a bottle and adding strips of newspaper on it.
The painting was done using the dry paint technique often used; apply a base color and add some dabbed off paint for shadows etc.

I added some raisins inside as if it were rat droppings.

For some strange reason no one wanted raisins on their pancakes that evening.

Tuesday, July 2, 2013

Halloween Pumpkins (2007 and up)

It's a tradition ever since 2006 to carve my own pumpkin and not in the traditional face way.

I like to challenge myself every year, hoping they'll be better and better.

Latest one; 2016:


I tried to do a dragon this year. It was quite a bit of work and not totally the shape I wanted, but I was restricted by the shape of the pumpkin.

--------------------------------------------------------------------------

The first non-face-pumpkin was a haunted house and the year after something with a witch. There are no pictures of those (or maybe they are somewhere, but I don't have them). These were just basic cut out patterns, no play of colors what so ever.

The 3rd was a tiger face in 2008 of which I did take a picture of:
A tiger face when the pumpkin wasn't lit.
The lit version. The red you see is the candle inside.
With some help from internet I learned there were at least 3 colors to be achieved when you carve: 
  • Black- Leave the skin.
  • Dark orange: Carve only the skin away.
  • Light orange: Carve all (flesh and skin)
There's another method where they carve the flesh out (leaving the skin) to create another darker tone of orange, but I haven't tried that yet.

For Halloween 2009 I chose a wolf pattern:


Unlit wolf pattern pumpkin

Lit wolf pattern pumpkin
 That year I did 2 pumpkins. At my moms work there was a colleague of hers who wanted to have a carved pumpkin as well.
Therefor I made a Gizmo from the Gremlins one:

Unlit Gizmo pumpkin

Lit Gizmo pumpkin

In the year 2010 I wanted something more difficult so I chose an owl.
Unlit owl

Lit owl
The owl was quite a bit of work, it's wing spreads across most of the side of the pumpkin. And due to all the white/ light colors in the picture I had to remove quite a bit, but leaving enough to keep the feather pattern standing.

 In 2011 I had to make one in a short amount of time, since I was carving together with someone else who did it for the first time, therefor needing a lot of assistance.
I did Remy the Rat from the movie Ratatouille.

The pictures of Remy seem to be missing. This is the only one I could find.
In 2012 I wanted to make something with a lot of detail. And that got to be Sackboy from Little Big Planet.

One of my old techniques were to make a printed copy and use some tracing paper to put the lines on the pumpkin. This didn't always work that well, because the ink of the paper wouldn't always transfer on the pumpkin. Instead I drew it directly on the pumpkin with a marker.
Normally I'd also use a small Stanley knife. But because of all the small parts I used a precision knife to be able to carve the woolly pattern out.


It took me several hours to carve. The Halloween party had already ended before I had finished.
Sackboy from Little Big Planet.
My camera had crashed shortly after Halloween.
Luckily this picture was already put on my computer.
Okay, so the wool pattern might not be as perfect as I'd liked it to be, but non the less it looks pretty awesome if I may say it myself.

2013 I apparently skipped a year.

In 2014 I went back to another elaborate/ crazy carving idea that took me hours to complete: This victorian pattern:


Not perfectly symmetric, but could be worse.

In 2015 I gave it my first attempt to do a 3D carving. This is a technique where you carve out a complete face from the pumpkin flesh, instead of carving all the way through.
This one doesn't have a top that comes off, therefor I couldn't put a candle inside. None the less it had some great decorational value.


My first attempt to do a 3D carving. Gollum turned out a bit too Smeagol for my liking (too friendly) ;)


Something completely different but still Halloween pumpkin related:
My paper mache Halloween pumpkin.
Pumpkin made from newspaper shreds and some carton.
 For this I used the techniques described by:
Stolloween Pumpkins

Check out their website; they have plenty of Halloween ideas you can make with paper mache.