Sunday, April 27, 2014

Wedding Statuette (2014)


A good friend of mine was getting married and I wanted to make them something personal.
I thought it would be nice to make them a little wedding statuette of them in caricature.


Finished piece with a lighter to show the actual size.

First off I made a quick sketch:
This is a terrible draft; I messed up her face.

Nothing special about that, more a draft to tell me things I should pay attention at and how their position would look like. Also I did a small study about wedding clothes and hair. They didn't give me any tips to use, so I just had to choose something.

I started with their heads. I figured that if I wasn't able to do their faces I wouldn't need to continue on their bodies.
The "rough" version. Lateron I remove/ add more clay to finish details that aren't right yet.

The most tedious job is haircuts. Her boyfriend has a bit curly hair without bold spot. Therefor I had to put hair by hair on his head. These are small rolled up pieces of clay, folded once, slightly curled up and pushed into place.

Almost halfway with his hair.
Since the faces turned out alright I started with their bodies.
For that I made a wire frame. I've worked before on things without a frame, but that didn't always work. It was recommended to use some sort of frame.

The wireframe; 1 piece for their legs, 1 piece for their body + arms. These are hot glued together.

I kept 2 separate figures because that's easier to work with and paint.

Later I glued their heads in place and added hands.

The groom. His right hand is missing.
It will be glued in place after he's painted.
The bride; her left hand is missing.
I can't fit them together when their hands are already on.


Now it was time to paint. I used pictures all the time to get their natural color about right and to add things like birth marks.

Groom in color
Bride in color

Back view


Front view.


I added a layer of varnish a nice plateau and put them in a bell jar, which actually fitted perfectly and added their names + wedding date.
Finished piece.
And if you're curious if it looked anything like the wedding couple when it comes to clothes/ hair:


Not really!
She had a dress with small sleeves; he wore a dark grey suit with a green tie. Her hair was a-symmetric.

But the most important thing was that they enjoyed their gift and it does look like them.

Friday, March 28, 2014

Wood/ Marble Imitation Course prt 2 (2013 and up)


Ever since my last post about my course about Wood/ Marble imitation I've made some more examples.
Please note that the actual colors look better than how they do on picture.
Next on my list is gilding with gold leaves and to bronze a small statue.
At the moment I'm almost finished with "Fountain" Mahogany.

Walnut Stretched (2013)
4 Windowed panel with Walnut Root wood (2013)
Walnut Root wood (2013)
Italian Walnut (2013)
Mahogany (2013)


Mahogany Flower Right Curved (2014)
Mahogany Flower S Curved (2014)


Wednesday, March 26, 2014

Chalkboard "Warm-up 4 Hoop" (2014)

This year the bi-annual "Samenloop voor Hoop" ("Walk of Hope")  is being held in my town.
My father organised a team of relay walkers. With that team we also have a market stand. My dad wants to sell warm drinks. That is how he came up with the "Warm-up 4 Hoop" team name (it's half Dutch).

I wanted to help out a bit, so I made a chalkboard for him to put the drinks on and the prices.

Finished chalkboard
It's a board of MDF with a pre-made pine frame, some clay, paint and a chalkboard sticker.
My father came up with the cup as a team logo, which I turned into a 3D model made out of clay.
3D logo
3D logo with the bottom text.
"Samenloop voor Hoop"
 The frame I coated with a brown primer. I added a thin layer of white paint to give it an older antique look. I also sanded the edges of the cup and plate a bit for that same reason.

The letters are done by hand. I used white paint and added some shadow lines with a darker gray tone.

Jigsaw Puzzle Plant Pot (2014)

Next to the garbage bin flower pots I also made a pot from a jigsaw puzzle.
I bought a puzzle mat to roll up your unfinished puzzle and with it was a free (but not a very pretty) jigsaw puzzle (1000 pieces). I decided to make something out of it and that became a flower pot.

I started with a circle of cardboard, to serve as a flat base. On that I put a plastic pot to use as a guidance to build around.
With some wood glue I glued every piece into place. Some pieces were trimmed to get 1 straight edge.

Side view of the finished pot, without color.
Top view of the finished pot, without color.
 Every 5 layers or so I would stop and put something heavy (a book) on it so it would flatten the surface and pressing the glue together.
Because I noticed the pile of pieces was running down very fast I decided to gain some extra height by glueing some of them vertically.

When all was done I spray painted the pot in a silver color.

Finished pot; side view
Finished pot; top view


The orange plastic pot isn't so nice, I'll change it with a black one.
Inside there is a small plastic container to prevent leaking when watering the plant.


Note: This was a very good puzzle for this type of project. Because all pieces had 2 holes and 2 pins aligned to each other. So no irregularities like 4 holes or  2 pins at associated edges.

Sunday, February 2, 2014

Wood Imitation Clock (2014)

For about 3 years I'm following a course of "wood and marble imitation".
Of which some examples are found here: Wood and marble imitation post.

Normally we do our exercises on a flat piece of board. Which is nice, but it can be used for many other purposes.
As an example I made a white clock border look like an antique walnut root wood one:

Finished piece
Original clock with the white border.
Clock painted with an orange base.


Because this is part of my specialty I can't give you the precise way to make it, since I hope to get a job with it one day.

But here are the basics:
To start of I gave the clock an orange base coating. This is the color we use to paint walnut wood on. If you would like f.e. oak wood, the color would be more beige, while f.e. mahogany has a more red like orange base.
After that I used a water base paint; pigments combined with water, wallpaper glue and a tiny drop of a component that will stick the pigments to the surface when the water evaporates.
This layer will hold most of the detail of the wood; f.e. knots and the wood grain.
When it all dried up I applied another layer which is an oil based mixture. If you'd use a water based paint again, you'd brush off the layer underneath.
This layer will add more color and depth to your piece.
You call it finished after this 2nd layer, but we decided to give it some more shades and such.
Therefor we let it dry once more and applied a 2nd oil based layer of paint.
To finish it off I applied 2 layers of varnish.

The ring was painted with some metallic water based paint and finished with a layer of gold shoe polish.

Detailed view of the ring and upper piece.


Detailed few of the bottom side of the border.

Garbage Bin Flower Pots (2014)

One day I was browsing through a store and found small plastic garbage bins on sale. I bought 2 of them to make a nice flower pot out of it.

Finished garbage bin
The bins come in several colors; green, blue and pink. I got 2 green ones and spray painted them black.
After 2 coatings, making sure everything was covered I dry brushed some silver paint over it.

Finished bin
Original bin
Spray painted bin

Then it was a matter of putting a small plant with a fitting innerpot inside and it's done.
A quick and easy project.

Side note: You could how ever add some orange, brown colors near the edges to give it a rusty effect.

Sunday, November 24, 2013

Wobble Head Hannah Hart (2013)

One of the things I wanted to try once in my life to make is a Wobble head, or head knocker or head wobbler.

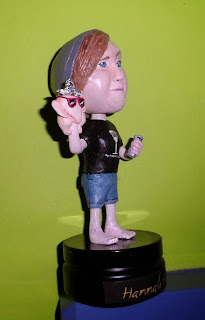
Final product on my crowded shelf.
I didn't really know of what or who to make one off. But I follow some people on Youtube and decided to make one in honor of Hannah Hart.
Hannah Hart is a Youtube celebrity famous for her comedy sketch "My Drunk Kitchen", which is basically her, drinking and trying to cook.
But that's not all she is. She's also a great comedian, motivational speaker and a supporter of food banks across the country (America).

I started by getting a picture to work with:
Hannah Hart with tin foil hat in My Drunk Chicken.

This one was taken from her My Drunk Chicken episode which is one of my favorites.
From this I made a sketch.
A Sketch drawn with pencil.
Wobble heads are never 100% accurate, they're meant to be more of a caricature of someone. Also I didn't want to get messed up with too many hair, therefor I drawn her with a beanie; a much worn item in her older videos.

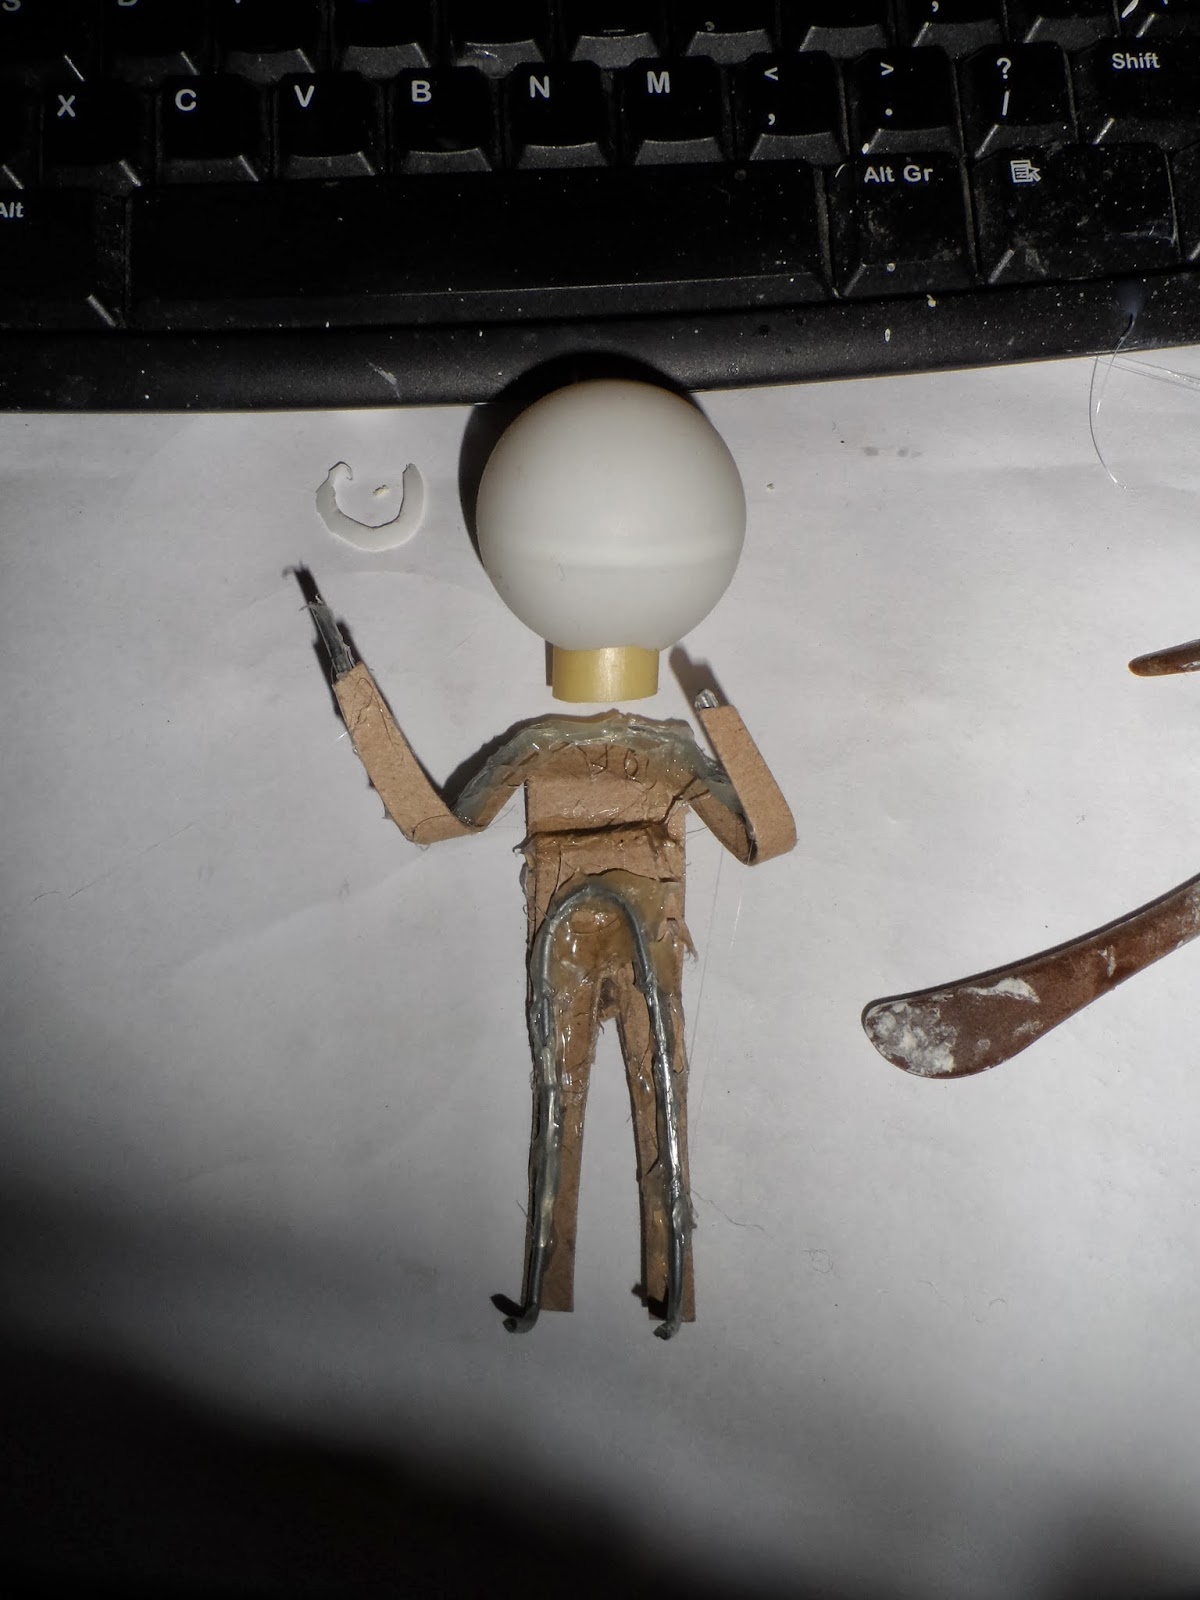
To create a 3D version of the drawing I made a simple frame.
Ping Pong ball head with a cardboard/ iron wire frame.

It's bent Iron wire glued to a cardboard figurine.
The head is made from a ping pong ball where a piece of PVC is glued inside. This makes the head lighter once you shape it with clay.

I then used some painting tape to shape the basics of the face.

Packed head with painting tape.

As clay I wanted to try paper clay. This type of clay is lighter than normal clay. But you need to make it yourself. I used a recipe of wood dust mixed with wood clay and wallpaper paste. This isn't the ideal mixture, for me it's still in an experimental fase.
None the less I managed to shape the face:

1st try at her face.

I added the beanie and hair:

Side of her face where her bang comes from underneath her beanie.

Then it was time to get it painted. I gave it a white primer and used acrylics to paint the rest.

Not the best face even made.
As you might see the face is far from perfect. I never made that much faces in my life, so you can imagine the difficulty making it accurate.
At that time I didn't know what to do with it, so it got on the pile of unfinished projects.

With FruitCorso I learned a bit more about the shapes of a face. I noticed one of the mistakes of the facial structure were the eye sockets. They need to be deeper.
When I had some spare time I picked up the project and tried to reshape the face.

A very awry and eerie picture; Sorry Hannah!


Fixed face.

When I finally was happy with the way it looked now, I gave it a new layer of primer.

The face with a white base.
I also started to work at the body.

Rough paper clay attempt.
With pencil I tried to fill in some detail of her face.

Because the paper clay wasn't ideal to work with I used normal air dried clay to do details on the body like the chicken, hand and feet. The body didn't have to be really light, so it wasn't a problem to do this.

There was still a problem with the face, I redid some details one more time and gave it a final paint job.
Then it was time to connect the head. I used thin iron wire which I spun around a tooth pick. The spring is glued into the PVC and in a hole in the neck and measures about 1,5 cm.

Finished Front side
Finished back side

Finished 3/4 view.
 I mounted the wobble head onto an empty candy container which I painted black. I also added Hannah's name and a famous quote of her "No one is wired wrong, because there is no wrong or right in the way we are."

Some references:
The Chicken is from the episode, but unlike the video I placed it on her hand instead of on her beer.
The beer is in her other hand.
The Tin foil cap is also from that same episode.
The glasses are a slight reference to friends. But Hannah does own a pair of pink glasses.
The shirt contains the logo of her show.
On the back is the logo of herself.
Her pants are taken from the "Oh, Internet" video
And the towel in her back pocket is taken from "My Hangover Kitchen: Breakfast Burrito"

I made an animated gif of the video I made to show it wobbles just fine.
Wobble, wobble, wobble.

Is I one day make another wobble head I shall cast it in resin, this way it's less fragile and easier to make hollow/ lighter.