 |
| Me sitting on the finished float, after a whole night of no sleep. |
For extra information about the FruitCorso at Tiel you can visit the Fruitcorso main site.
In short: The Fruitcorso is a parade with floats, but different than regular floats. Our floats are decorated with fruit, vegetables and seeds; making this quite unique in the world.
It all started as a publicity stunt to get the region the Betuwe more known. And this region is mainly known for the fruits that grow around here.
Several villages compete every year to make the best looking float of all.
Our town had the problem that we didn't have that many fresh designers. In 2008 and 2009 they did an open invite for new designing talent, but with no good end results. I decided to give it a shot.
I made a basic design and a well known former designer would help me out with things.
This became "Magnolia Magnificus" who will be discussed in the next topic.
Half way through we noticed that the project was too big for the small society we had. I got a choice: Stop this, continue with it next year and go for the Open Category (no points, no classification) or continue, stop with detail and just try to finish things as quickly as possible with a big chance it will turn out like crap and getting the lowest score.
We chose to stop, design a small new float (because of sponsoring we needed to have a float) and finish things next year.
From my main design there was a Minotaur He was erased from the design, because I already had to much going on. And less was more.
This Minotaur became the base of our Open Category float. Someone came up with the idea to do a time themed concept. Those things combined became "The Guardian of Time"
 |
| The model of the Guardian of Time. Funny note: I accidentally left it on the car and drove off. I had to return to pick up the pieces and glue them back together. |
Now I try to explain how such a float is build.
We start with a metal frame. Because fruit and vegetables are really heavy we need a sturdy frame to support that weight. We got a bunch of welders who are busy for a couple of months to finish the base. (No pictures, sorry)
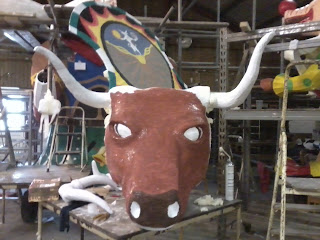
We also start with sculpting organic shapes from blocks of Styrofoam. It's quite a challenge. I wasn't experienced with it nor was my sculpting buddy. That is why we used several cans of expanding foam to paste some pieces of Styrofoam back in place and make it look okay again.
We were quite happy with the end result. It might not be 100% accurate when you hold a bull against it. But it's a Minotaur, so we can differ from the original.
We also start with sculpting organic shapes from blocks of Styrofoam. It's quite a challenge. I wasn't experienced with it nor was my sculpting buddy. That is why we used several cans of expanding foam to paste some pieces of Styrofoam back in place and make it look okay again.
 |
| Really organic shapes like head, hand and feed are sculpted from Styrofoam. |
 |
| We add a layer of paper maché and smooth some part with plaster. After that another layer of paper is placed. |
 |
| Painting time |
 |
| Nearly finished painted version. Next the lines are drawn where which item has to be glued on. (I don't have that picture) |
When things are painted the seeds go on. Some are scattered in a layer of glue, others are done one by one.
It's a tedious work sometimes.
In the last couple of weeks long lasting fruits/ vegetables go on: f.e. beets, carrots, potatoes, grapes. tomatoes, paprika etc.
And in the last week the fresher products are glued: apples, pears, peppers (they color to red if they're glued on too early), pieces of cauliflower etc.
Then the last night is a none stop glue-fest. The delicate fruits come in like strawberries, raspberries, blackberries etc. And we have to finish as early as possible to be able to get in time in Tiel.
This piece had several small details. It was holding an hourglass, with clocks at the top and base, as a hammer. As a shield he had a sundial (from which the arrow was hold by a little Minotaur). Around his neck he had a locket with a clock and a 3D cow face (his girlfriend?). And his belt held the astrological signs.
At his "skirt" he had a hammer and bell symbol, as a "Ding Dong, you're time is done" idea.
There was a request to add another element, because we had some empty space in the front. I got the idea to make a time turner (Harry Potter reference). I used to big bottles (used for wine making I was told) and filled them with small Tapioca seeds we had plenty off.
I took the thing home afterwards, hoping I could get it clean and paint it. But up until now it's only collecting dust. The contact glue/seed mix turned out to be to hard to be removed and the frame was bend due to the weight (with all the spinning and such)
Below some of the finished photo's:
Something that was really special about this specific FruitCorso was it being the 50th anniversary. Because of that our Prince and Princess; Willem-Alexander and Máxima and their 3 kids visited. It was really cool. Especially because I was chosen together with another member of our club to meet Máxima because our club was the unluckiest that year (there were some robberies; most of our tools were stolen). She was super nice.
Here you can watch the official tv special:
http://www.uitzendinggemist.nl/afleveringen/976499
Sidenote: People might wonder: Is the fruit still edible?
The answer is: No.
We use contact glue which gets into the fruit/vegetable therefor it can't be used for consumption anymore.
Isn't that a waste with all those starving kids in Afrika?
In a way it is, but at the other hand: These products don't go to Afrika, so those kids will never see them anyway. Next to that we do pay for our supplies, with which we stimulate the economy, just as the whole event is doing.
At his "skirt" he had a hammer and bell symbol, as a "Ding Dong, you're time is done" idea.
There was a request to add another element, because we had some empty space in the front. I got the idea to make a time turner (Harry Potter reference). I used to big bottles (used for wine making I was told) and filled them with small Tapioca seeds we had plenty off.
 |
| One item I was proud of: A time turner. It was a bit stolen from Harry Potter. |
Below some of the finished photo's:
 |
| Backside when it took off to Tiel. |
 |
| Frontside when it took off to Tiel. |
 |
| How it looked from the VIP stage during the Parade. |
Something that was really special about this specific FruitCorso was it being the 50th anniversary. Because of that our Prince and Princess; Willem-Alexander and Máxima and their 3 kids visited. It was really cool. Especially because I was chosen together with another member of our club to meet Máxima because our club was the unluckiest that year (there were some robberies; most of our tools were stolen). She was super nice.
Here you can watch the official tv special:
http://www.uitzendinggemist.nl/afleveringen/976499
Sidenote: People might wonder: Is the fruit still edible?
The answer is: No.
We use contact glue which gets into the fruit/vegetable therefor it can't be used for consumption anymore.
Isn't that a waste with all those starving kids in Afrika?
In a way it is, but at the other hand: These products don't go to Afrika, so those kids will never see them anyway. Next to that we do pay for our supplies, with which we stimulate the economy, just as the whole event is doing.


